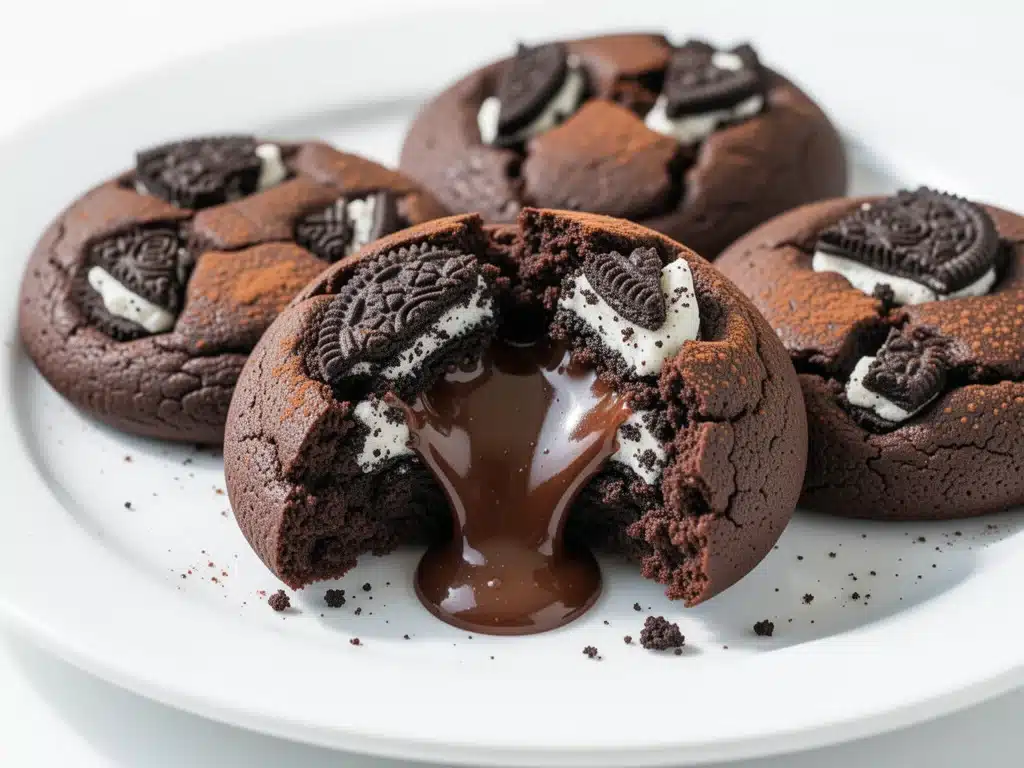
Last Tuesday, I was standing in my kitchen at 11 PM, staring at a bag of Oreos that I had bought for a party that got cancelled. I was hungry. I was tired. And I had this sudden, almost violent craving for something sweet that wasn’t just a plain chocolate chip cookie. I wanted something with a center. Something with a surprise.
So I did what any self-respecting home cook does when they’re sleep-deprived and craving dessert: I improvised. I took a batch of my favorite thick, chewy chocolate cookie dough, flattened a disc, stuffed a whole Oreo inside, and rolled it back up. I threw it in the oven. Fifteen minutes later, I pulled one out. It looked like a normal cookie. I bit into it. And then—boom. The center collapsed. The Oreo softened into a warm, creamy, chocolatey lava that oozed all over my hands.
I ate it in three bites. Then I made another. And another. By midnight, I had eaten four cookies and felt zero regret. In fact, I felt like I had discovered the holy grail of dessert.
That night, I accidentally created what has now become my absolute favorite way to use up leftover Oreos (or just because I like to treat myself). These Chocolate Oreo Stuffed Cookies are not just cookies. They are an experience. They are gooey, they are rich, and they are honestly a little bit dangerous because one cookie is never enough.
I’ve tested this recipe about twenty times now. I’ve tried different chocolate chips, different types of Oreos, different baking times. And I’ve finally cracked the code on how to get that perfect balance: a cookie that is crisp on the edges, chewy in the middle, and has a center that is still soft and melty when you bite into it. If you’ve ever wanted to impress your friends, your kids, or just yourself with a dessert that looks professional but is ridiculously easy to make, this is the one.
Here’s the thing about stuffed cookies: they seem intimidating. People think you need special techniques or fancy equipment. You don’t. You just need patience and a freezer. Let me walk you through exactly how I make these Chocolate Oreo Stuffed Cookies that have won over every single person who’s tried them.
Why You’ll Love This Recipe
There are about a dozen reasons I keep making these, but if I had to narrow it down to the ones that actually matter for your weeknight sanity and your dessert cravings, here they are:
The “Gooey” Factor is Real
Most stuffed cookies dry out in the middle or the Oreo stays too crunchy. Not these. Because the Oreo is wrapped in dough and baked, it steams slightly inside the cookie, becoming soft and cake-like in the center while the outside stays chocolatey. It’s the best of both worlds.
Impress Without the Stress
I’ve served these at potlucks, birthday parties, and casual dinner nights. Every time, people ask, “Did you buy these?” Every time, I say no. They look like something you’d get at a high-end bakery, but they cost pennies to make. It’s a huge win for your ego and your wallet.
Perfect for Meal Prep
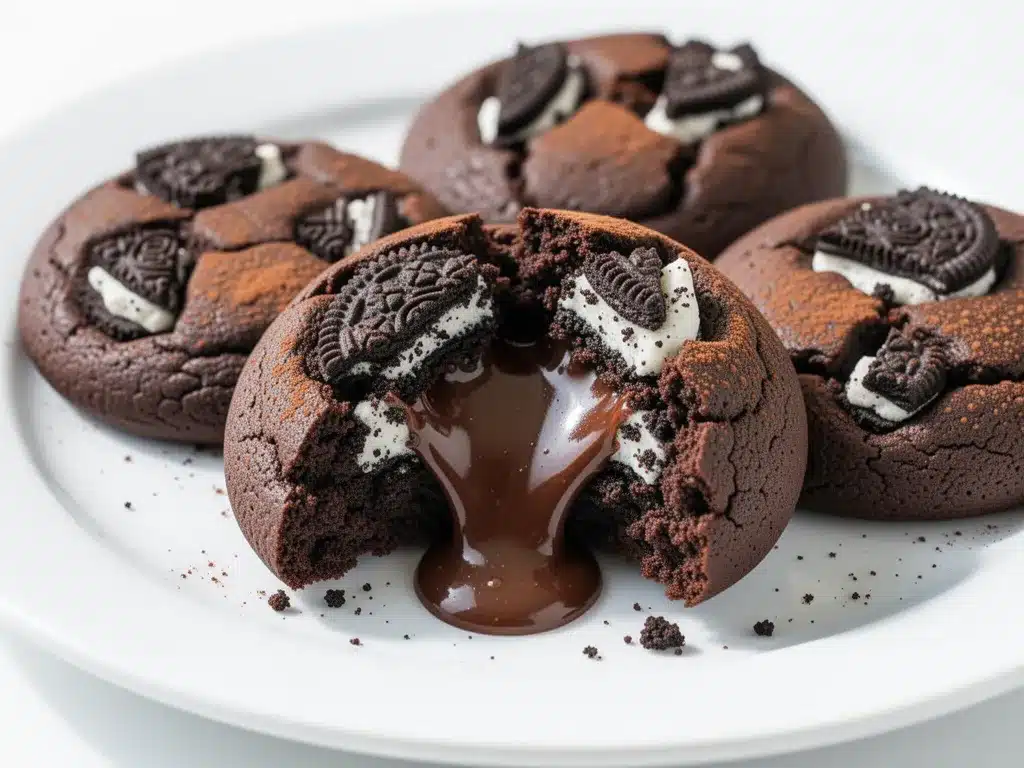
Here’s my secret weapon: you can freeze the dough balls *before* baking. I make a big batch, freeze them on a tray, and then pop them into a bag. When I want a warm cookie at 9 PM, I just pull one out and bake it. It’s like having fresh cookies on demand.
Customizable Chaos
While the classic Oreo version is my go-to, this method works with anything. Stuffed with a peanut butter cup? Done. Stuffed with a square of dark chocolate and sea salt? Amazing. Stuffed with a mini KitKat? Sure, why not. It’s a versatile framework for cookie creativity.
This recipe has completely changed my dessert routine. It’s my answer to “I need something sweet right now” that feels special but doesn’t require a trip to the store. No complicated techniques, no weird ingredients, just reliable, delicious food that makes everyone happy.
Ingredients You’ll Need
Here’s the best part: you probably have most of this already in your pantry. This isn’t a recipe that requires a special trip to a specialty store. I’m particular about three ingredients here, and I’ll tell you exactly why.
For the Cookie Dough
Unsalted butter (1 cup / 226g, softened) — This is crucial. I use unsalted so I can control the saltiness. It needs to be softened to room temperature. If it’s too cold, it won’t cream properly. If it’s melted, your cookies will spread too thin. I take it out of the fridge about an hour before I start.
Granulated sugar (¾ cup / 150g) — This helps create those crisp edges. I don’t swap this out. It provides the structure and the crunch.
Brown sugar (1 cup / 200g, packed) — This is the chewy part. Use light or dark brown sugar; I usually use light, but dark adds a deeper molasses flavor. Make sure it’s packed tightly into the cup.
Eggs (2 large, room temperature) — Room temperature eggs emulsify better with the butter and sugar. Cold eggs can cause the mixture to break. If I forget, I put them in a bowl of warm water for 5 minutes.
Vanilla extract (2 teaspoons) — Use real vanilla, not imitation. It makes a huge difference in chocolate cookies. I love using Nielsen-Massey because it’s potent.
All-purpose flour (2 ¼ cups / 280g) — Don’t overmeasure this! Spoon it into the cup and level it off. If you scoop directly, you’ll pack it down and end up with dry, crumbly cookies.
Cocoa powder (¼ cup / 25g, unsweetened) — I use Dutch-processed cocoa powder because it’s darker and has a richer flavor. Natural cocoa works too, but the color will be lighter.
Baking soda (1 teaspoon) — This helps the cookies spread and brown.
Salt (½ teaspoon) — Even with unsalted butter, you need salt to balance the sweetness. It’s non-negotiable.
For the Filling
Oreo cookies (12 full cookies) — I use the classic Original Oreos. Double Stuffs work too if you want extra cream, but regular Oreos have a better cookie-to-cream ratio for this. You can also use Mint Oreos or Golden Oreos for a twist.
Chocolate chips (½ cup / 85g) — I use semi-sweet chocolate chips to sprinkle on top for extra gooeyness. Dark chocolate chips work too if you want less sweetness.
Sea salt flakes (optional) — For sprinkling on top after baking. This elevates the flavor profile instantly.
Shopping Tips
I always buy my Oreos in the family-size bag when they’re on sale. I separate them, freeze the ones I won’t use immediately, and keep a stash in the freezer. This way, I can make these cookies anytime the craving hits without running to the store. Also, buy a block of butter and soften it yourself—pre-softened butter in tubes sometimes has additives that affect texture.
Equipment Needed
You don’t need fancy equipment for this. Here’s what I actually use:
Large mixing bowl — I use a 5-quart glass bowl. It’s big enough to mix the dough without splattering. A stand mixer bowl works too.
Electric mixer — Hand mixer or stand mixer. Creaming the butter and sugar by hand is possible but takes elbow grease. I use my stand mixer on medium speed.
Baking sheets — I use two half-sheet pans. Make sure they are cool before adding new dough. Hot pans will melt the butter too fast.
Parchment paper — Line your baking sheets. This prevents sticking and makes cleanup a breeze. I never bake cookies directly on metal.
Cooling rack — Essential for cooling the cookies evenly. If you leave them on the hot pan, they’ll keep cooking and get dry.
Measuring cups and spoons — Precision matters in baking. I use both volume and weight measurements because a scale is the most accurate tool you can own.
Freezer-safe container or bag — For storing the frozen dough balls if you want to meal prep.
How to Make It: Step-by-Step
Alright, let’s make this! I’m walking you through exactly how I do it, including the little tricks I’ve picked up. This process takes about 45 minutes total, but most of that is baking time.
Step 1: Cream the Butter and Sugars (3-5 minutes)
In your large mixing bowl, combine the softened butter, granulated sugar, and brown sugar. Beat on medium-high speed for about 3-4 minutes. You want this mixture to be light, fluffy, and pale in color. This step incorporates air, which helps the cookies rise. Don’t rush this. If it looks dense, keep beating. I usually set a timer so I don’t forget.
Step 2: Add Eggs and Vanilla (1-2 minutes)
Add the eggs one at a time, beating well after each addition. Then add the vanilla extract. Scrape down the sides of the bowl with a spatula to make sure everything is incorporated. The mixture should look smooth and creamy.
Step 3: Mix Dry Ingredients (2 minutes)
In a separate medium bowl, whisk together the flour, cocoa powder, baking soda, and salt. This ensures the cocoa powder is evenly distributed and there are no lumps. Then, gradually add the dry ingredients to the wet mixture on low speed. Mix just until combined. Overmixing at this stage develops gluten, which makes cookies tough. Stop as soon as you see no more streaks of flour.
Step 4: Chill the Dough (30 minutes)
This is the step most people skip, but I never do. Cover the bowl with plastic wrap and refrigerate for at least 30 minutes. Chilling the dough prevents the cookies from spreading too thin and concentrates the flavors. If you’re in a huge hurry, you can skip this, but the texture won’t be as good. Pro tip: If you’re making these ahead, you can chill the dough for up to 3 days.
Step 5: Prepare the Oreos
While the dough chills, take your Oreo cookies and separate the cream filling from the cookie wafers? No! Wait. Do not separate them. You want the whole cookie. Just make sure they are intact. If you’re using Double Stuffs, be aware they might be a bit thicker, so you might need a little more dough.
Step 6: Assemble the Cookies
Take a portion of dough (about 2 tablespoons) and flatten it into a disc in your palm. Place one whole Oreo in the center. Fold the dough over the Oreo, sealing the edges completely. Roll it into a ball. Make sure there are no cracks or gaps where the Oreo is visible. If you see cracks, press them shut with your fingers. Place the ball on a parchment-lined baking sheet. Repeat with remaining dough and Oreos. You should get about 12-15 cookies depending on size.
Step 7: Freeze (Optional but Recommended)
For the best results, freeze the cookie balls for 15-20 minutes. This helps them hold their shape in the oven and creates that thick, chewy texture. If you skip this, they might spread a bit more, but they’ll still taste good.
Step 8: Bake (10-12 minutes)
Preheat your oven to 350°F (175°C). Place the baking sheets in the oven and bake for 10-12 minutes. The cookies should look set on the edges but still soft in the center. They will not look fully cooked in the middle—that’s the point! Overbaking is the enemy of gooey centers.
Step 9: Cool and Serve
Remove from the oven and let them cool on the baking sheet for 5 minutes. This allows them to set. Then transfer to a cooling rack. Sprinkle with sea salt flakes if desired. Eat warm for the ultimate gooey experience.
Expert Tips & Tricks
Here’s everything I’ve learned from making these dozens of times. These tips will save you from my mistakes.
Don’t Overbake
This is the #1 mistake. When you take them out, the center will look undercooked. It’s supposed to look soft. It will firm up as it cools. If you bake until the center is firm, you’ll get a dry, cakey cookie instead of a gooey one. Trust the timer, not your eyes.
Seal the Edges Well
If the Oreo isn’t fully sealed in dough, the cream will leak out and burn on the pan. Make sure you press the dough firmly around the edges. I pinch the bottom seam shut to be extra safe.
Use Room Temperature Ingredients
I cannot stress this enough. Cold butter doesn’t cream properly. Cold eggs don’t emulsify. Room temperature ingredients ensure a smooth, consistent dough that bakes evenly.
Chill Before Baking
Even if you don’t freeze them, chilling the dough balls helps them keep their shape. Warm dough spreads faster than the oven can set it, leading to flat cookies.
Cookie Size Consistency
Try to make all the cookies the same size. If some are bigger and some are smaller, they’ll bake at different rates. I use a small ice cream scoop to portion the dough for uniformity.
Variations & Substitutions
Once you’ve nailed the basic version, here’s how you can mix it up. I’ve tried all of these.
Peanut Butter Cup Stuffed
Instead of an Oreo, stuff the dough with a mini peanut butter cup. The salty-sweet combo is incredible. You might need a little more dough here since peanut butter cups are chunkier.
Dark Chocolate & Sea Salt
Use dark chocolate chunks instead of chips, and stuff the center with a square of high-quality dark chocolate. Sprinkle with flaky sea salt. This is for the serious chocolate lovers.
Cookie Butter Version
Spread a thin layer of Biscoff cookie butter on the Oreo before wrapping. Or skip the Oreo and just swirl cookie butter into the dough. Both are amazing.
Mint Oreo
Use mint Oreos for a dessert that tastes like an After Eight mint. The mint flavor pairs beautifully with the dark chocolate dough.
Dairy-Free Option
Use dairy-free butter and dairy-free chocolate chips. There are dairy-free Oreos available in many stores now. The texture will be slightly different but still delicious.
Serving & Storage
How to Serve:
I usually serve these warm, right after they’ve cooled for 5 minutes. They are best enjoyed with a cold glass of milk. I also like to serve them with a dollop of whipped cream or a scoop of vanilla ice cream for a decadent dessert.
Storage:
Room Temperature: Store in an airtight container for up to 3 days. They might get a bit soft, but they’re still good. If they get too soft, pop them in the microwave for 10 seconds.
Freezer (Dough): This is my favorite method. Freeze the unbaked dough balls on a baking sheet, then transfer to a freezer bag. They’ll keep for up to 3 months. Bake straight from frozen, adding 1-2 minutes to the bake time.
Freezer (Baked): You can freeze baked cookies, but the texture might change slightly. Reheat in the oven at 300°F for 5 minutes to restore freshness.
Reheating: Never microwave for too long! 10-15 seconds is enough to warm them up without making them rubbery. The microwave is great for reviving a cold cookie.
Nutrition Information
I’m not a nutritionist, but here’s the breakdown if you’re tracking. Keep in mind, these are rich cookies, so portion control is key.
Per Cookie (approximate):
- Calories: 280
- Protein: 3g
- Carbs: 38g
- Fat: 14g
- Sugar: 24g
These are definitely a treat. I usually enjoy one or two with my coffee or tea. If you want to lighten it up, you can reduce the sugar slightly, but the texture will be affected. For me, the joy of a gooey Oreo center is worth the extra calories.
Frequently Asked Questions
Q: Can I use homemade Oreo cookies?
A: Yes! Homemade Oreos work great. Just make sure they are the same size as store-bought ones. If they are larger, you might need more dough. The homemade cream filling might be softer, so chill the dough longer to compensate.
Q: Why did my cookies spread too much?
A: This usually happens if the butter was too soft or melted, or if you didn’t chill the dough. Make sure your butter is softened but still holds its shape. Also, ensure your baking sheets are cool before adding new dough. If you reuse a hot pan, the dough will melt instantly and spread.
Q: Can I freeze the baked cookies?
A: You can, but they might lose some of their gooey texture when thawed. I recommend freezing the dough balls instead. They bake up fresh and gooey every time.
Q: What if I don’t have cocoa powder?
A: You can make a plain chocolate chip cookie version. Just omit the cocoa powder and maybe add 1 extra tablespoon of flour. The Oreo stuffing will still provide the chocolate flavor, so it’ll work fine.
Q: How do I know when they are done?
A: The edges should be set and slightly firm, but the center should still look soft and puffy. They will firm up as they cool. If you wait until the center is firm in the oven, they will be overbaked.
Q: Can I use gluten-free flour?
A: Yes, a 1:1 gluten-free flour blend works well. Make sure it contains xanthan gum, or add ½ teaspoon to the dry ingredients. The texture might be slightly more crumbly, but it’ll still be delicious.
Final Thoughts
So that’s my go-to Chocolate Oreo Stuffed Cookies! I’ve probably talked your ear off at this point, but when you make a recipe this often, you have a lot to say about it.
This has saved my dessert routine more times than I can count. It’s my answer to “I need something sweet” when I’m tired, don’t want takeout, and still want something that tastes really good. My kids are happy, my husband’s happy, and I’m happy because I’m not stressed about cooking.
Make it yours! Try different add-ins, swap in your favorite chocolate, or adjust the dough thickness. The best recipes are the ones you adapt to your family’s tastes.
If you make this, drop a comment and let me know what you think! I love hearing how recipes turn out in your kitchen. And if something doesn’t work, tell me that too—I’m here to help troubleshoot.
Happy cooking! And I hope your kitchen smells half as good as mine does right now.
Pin This Recipe!


Chocolate Oreo Stuffed Cookies: Easy Gooey Centers
- Total Time: 45 minutes
- Yield: 12-15 cookies 1x
Description
Thick, chewy chocolate cookies stuffed with a whole Oreo cookie, creating a gooey, melty center. These cookies are crisp on the edges, soft in the middle, and easy to make with pantry staples.
Ingredients
- 1 cup (226g) unsalted butter, softened to room temperature
- ¾ cup (150g) granulated sugar
- 1 cup (200g) packed brown sugar (light or dark)
- 2 large eggs, room temperature
- 2 teaspoons vanilla extract
- 2 ¼ cups (280g) all-purpose flour
- ¼ cup (25g) unsweetened cocoa powder (Dutch-processed recommended)
- 1 teaspoon baking soda
- ½ teaspoon salt
- 12 whole Oreo cookies (Original, Double Stuffs, or Mint)
- ½ cup (85g) semi-sweet chocolate chips (optional, for topping)
- Sea salt flakes (optional, for sprinkling)
Instructions
- In a large mixing bowl, combine softened butter, granulated sugar, and brown sugar. Beat on medium-high speed for 3-4 minutes until light, fluffy, and pale in color.
- Add eggs one at a time, beating well after each addition. Add vanilla extract and scrape down the sides of the bowl. Mix until smooth.
- In a separate medium bowl, whisk together flour, cocoa powder, baking soda, and salt.
- Gradually add dry ingredients to the wet mixture on low speed. Mix just until combined; do not overmix.
- Cover the bowl with plastic wrap and refrigerate the dough for at least 30 minutes (or up to 3 days).
- Preheat oven to 350°F (175°C). Line baking sheets with parchment paper.
- Take about 2 tablespoons of dough and flatten into a disc. Place one whole Oreo in the center. Fold dough over the Oreo, sealing edges completely, and roll into a ball. Ensure no cracks are visible.
- Place cookie balls on prepared baking sheets. For best results, freeze for 15-20 minutes to help them hold shape.
- Bake for 10-12 minutes. Edges should be set but centers should still look soft.
- Remove from oven and let cool on the baking sheet for 5 minutes to set. Transfer to a cooling rack.
- Sprinkle with sea salt flakes if desired. Serve warm.
Notes
Do not overbake; the center should look soft when removed from the oven as it will firm up while cooling. Ensure butter is softened but not melted, and eggs are at room temperature for proper emulsification. Chilling the dough is crucial for texture and preventing excessive spreading. You can freeze unbaked dough balls for up to 3 months and bake straight from frozen, adding 1-2 minutes to bake time.
- Prep Time: 30 minutes
- Cook Time: 12 minutes
- Category: Dessert
- Cuisine: American
Nutrition
- Serving Size: 1 cookie
- Calories: 280
- Sugar: 24
- Sodium: 150
- Fat: 14
- Saturated Fat: 8
- Carbohydrates: 38
- Fiber: 2
- Protein: 3
Keywords: chocolate cookies, oreo stuffed cookies, gooey cookies, dessert, baking, easy cookies, chocolate chip cookies, homemade cookies


